
1.Cleansing
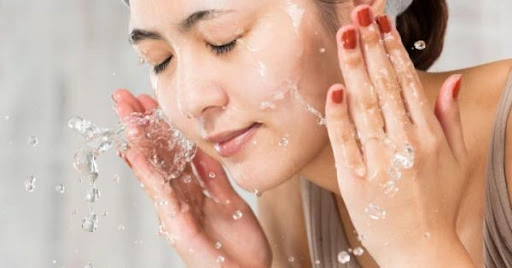
Purpose: Removes dirt, oil, sweat, dead skin cells, and pollutants from your face.
Importance: Clean skin allows makeup to apply evenly, prevents clogged pores, and reduces breakouts.
Tip: Choose a cleanser suitable for your skin type:
Oily skin → Foaming cleanser
Dry skin → Cream-based cleanser
Combination or sensitive skin → Gentle, mild cleanser
2.Moisturizing
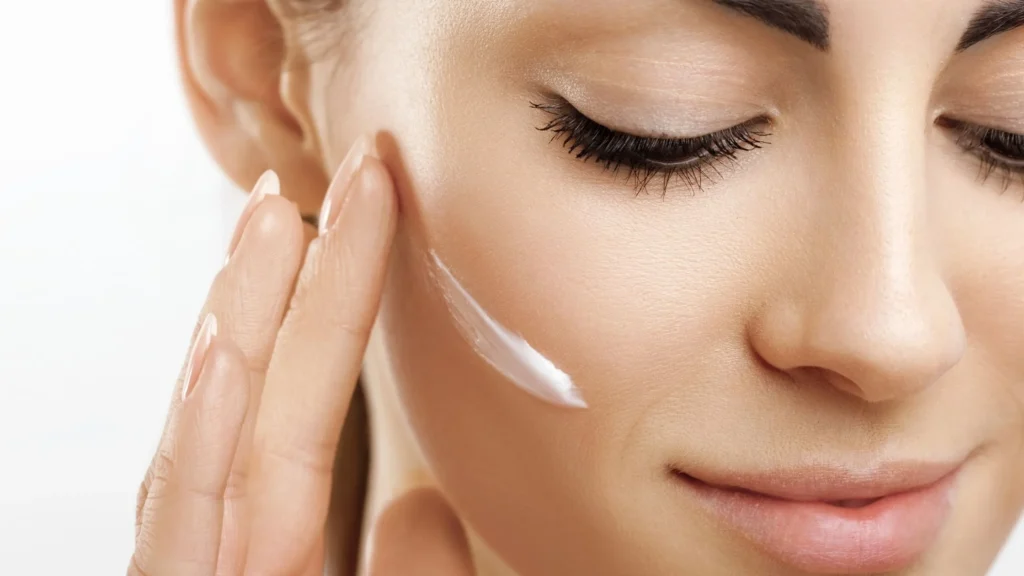
Purpose: Hydrates and nourishes the skin, creating a smooth base for makeup.
Importance: Moisturized skin ensures foundation and concealer blend seamlessly and prevents a dry or cakey look.
Tip:
Oily skin → Lightweight gel-based moisturizer
Dry skin → Rich cream-based moisturizer
Normal/Combination → Light cream or lotion
3.Applying Primer
Primer is an essential makeup step that creates a smooth and even surface for foundation and other products. It helps makeup last longer, prevents it from smudging, and reduces the appearance of pores, fine lines, and uneven texture. Primer also ensures that your skin looks flawless, polished, and radiant under different lighting conditions.
Take a pea-sized amount of primer.
Apply small dots on forehead, nose, cheeks, and chin.
Blend evenly using fingers, a sponge, or a brush.
Focus on areas where makeup tends to fade or crease (T-zone, under eyes).
Wait 1–2 minutes before applying foundation to let the primer set.
Tips for Beginners:
Choose a primer according to your skin type:
Oily skin: Mattifying primer
Dry skin: Hydrating primer
Combination skin: Lightweight balancing primer
Use only a small amount; too much can make your skin greasy.
4.Applying Foundation
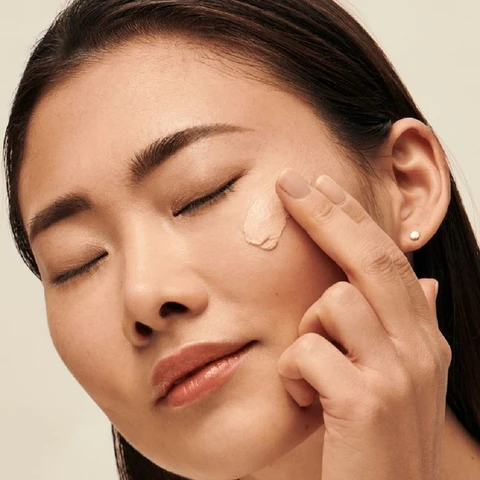
Foundation is used to even out your skin tone and create a flawless base for the rest of your makeup. Choosing the right shade is crucial — it should match your natural skin color for a natural look. Proper application ensures a smooth, radiant finish and helps concealer, blush, and other products blend seamlessly How to Apply Foundation (Beginner-Friendly):
Choose a foundation that matches your skin tone.
Apply small dots on the forehead, cheeks, nose, and chin.
Blend evenly using a makeup sponge, brush, or clean fingers, starting from the center of your face outward.
Pay attention to areas like the jawline, hairline, and nose to avoid streaks.
Set lightly with translucent powder if desired to reduce shine and increase longevity.
Tips for Beginners:
Use light layers instead of applying too much at once.
Blend well to avoid patchy or cakey skin.
Always check your foundation in natural light to ensure it matches your skin tone.
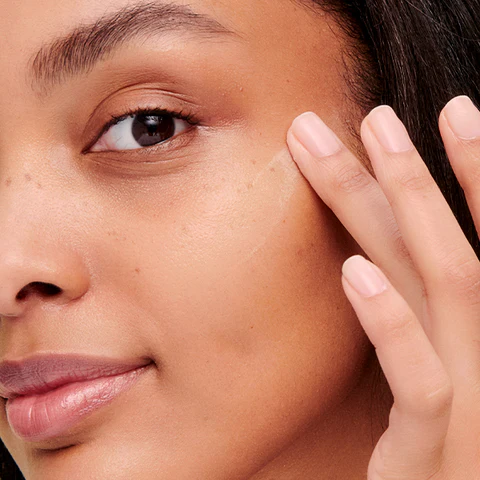
5.Applying Concealer
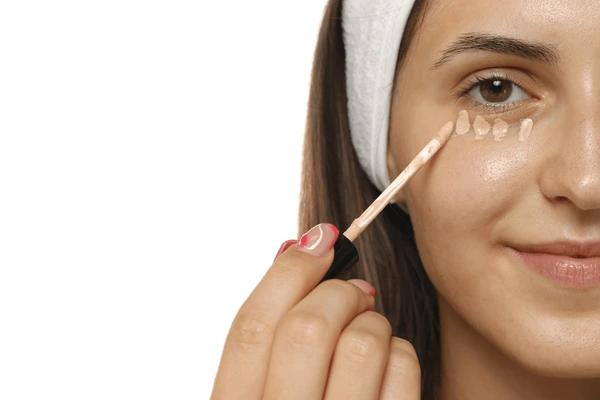
Concealer is used to hide dark circles, blemishes, redness, and other imperfections on your face. It provides a more even and flawless skin appearance and works perfectly on top of your foundation. Proper application ensures that your makeup looks polished and natural, even for beginners. How to Apply Concealer
Choose a concealer shade slightly lighter than your foundation for under eyes, or matching your foundation for blemishes.
Apply small dots on areas you want to cover: under the eyes, around the nose, on blemishes, or spots.
Blend gently using a makeup sponge, brush, or fingers, tapping lightly instead of rubbing.
Set with a light dusting of powder if needed to prevent creasing.
Tips for Beginners:
Use minimal product at first; it’s easier to add more if needed.
Blend well into the foundation to avoid visible lines or patches.
Focus on brightening under eyes to make your face look awake.
6.Set with Powder

Setting your foundation and concealer with powder helps to lock your makeup in place, control shine, and reduce the appearance of oil throughout the day. Powder creates a smooth, matte finish, ensuring your makeup lasts longer and looks fresh. For beginners, this step is essential to prevent makeup from sliding off or appearing cakey.
How to Apply Powder
Choose a translucent or skin-toned powder.
Use a large, fluffy brush or makeup sponge.
Lightly dust the powder over your face, focusing on areas that get oily (T-zone: forehead, nose, chin).
Avoid over-powdering, as it can make your skin look dry or heavy.
Tips for Beginners:
Tap off excess powder from the brush before applying.
Use gentle, circular motions to blend evenly.
Reapply lightly during the day if your skin becomes shiny.
7.Eyebrows
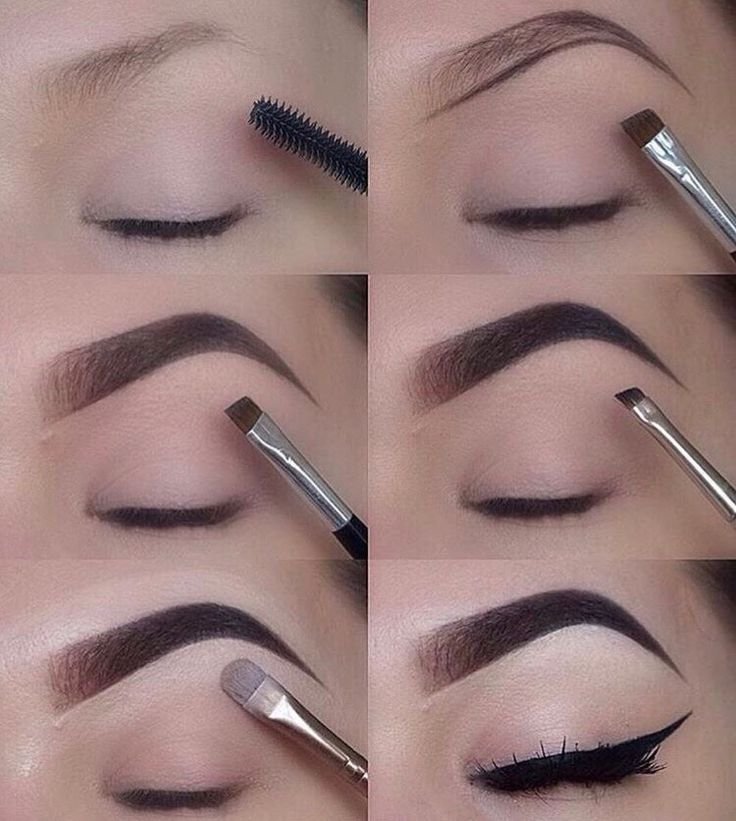
Eyebrows frame your face and enhance your overall look. Well-groomed and filled-in eyebrows can define your eyes and balance your facial features. For beginners, the goal is to create a natural shape that complements your face rather than over-drawing.
How to Shape & Fill Eyebrows
Choose an eyebrow pencil, powder, or gel close to your natural hair color.
Start by shaping the brow with light strokes to outline the natural shape.
Fill in sparse areas using short, hair-like strokes for a natural look.
Use a spoolie brush to blend and soften the product, avoiding harsh lines.
Optional: Apply a clear brow gel to set hairs in place.
Tips for Beginners:
Avoid using a color that is too dark; it can look harsh.
Work gradually, adding product little by little.
Focus on symmetry and enhancing your natural brow shape.
8. Applying Eyeshadow

Eyeshadow adds color, depth, and dimension to your eyes. For beginners, it’s best to start with neutral shades like beige, brown, or soft pinks. The goal is to enhance your eyes naturally without overwhelming the look. Proper blending ensures a smooth transition between colors, giving a polished and professional finish.
Prime your eyelids with a primer or light concealer to make the eyeshadow last longer.
Choose a neutral base color and apply it all over the eyelid using a fluffy brush.
Apply a slightly darker shade to the crease to add depth. Blend well in a back-and-forth motion.
Optional: Add a lighter shade or shimmer to the inner corner or brow bone for highlighting.
Finish by blending edges for a smooth, gradient effect.
Tips for Beginners:
Always start with small amounts of product; you can build intensity gradually.
Use clean brushes for blending to avoid harsh lines.
9.Applying Eyeliner
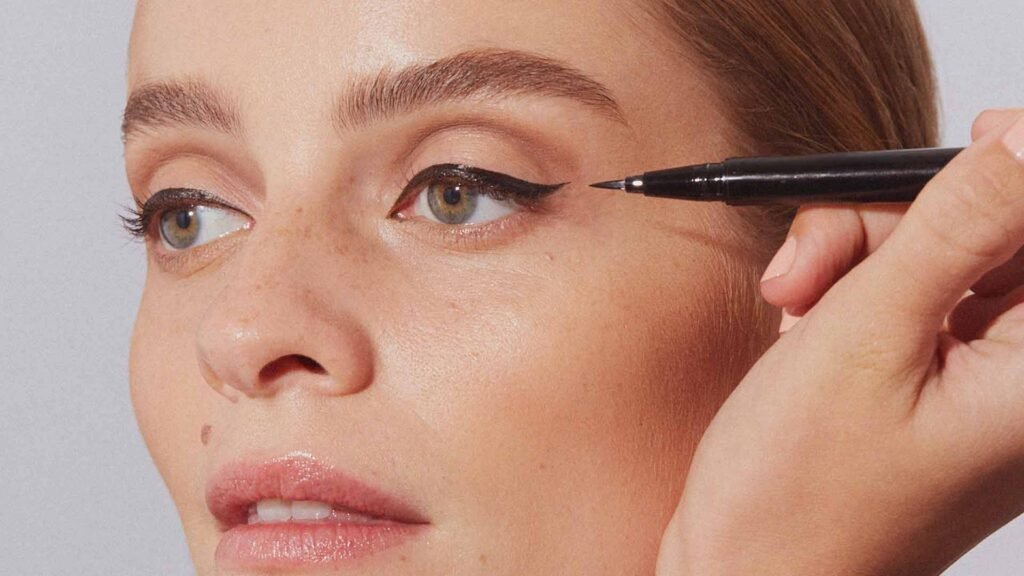
Eyeliner is used to define and enhance your eyes, making them appear larger, sharper, and more expressive. For beginners, starting with a thin, natural line along the upper lash line is the easiest way to get a polished look without overdoing it. Eyeliner can be applied using pencils, gel, or liquid formulas depending on your comfort level.
Choose the right eyeliner: Pencil for easy control, gel for smooth lines, or liquid for precision.
Start at the inner corner of your upper lash line.
Draw a thin line along the lash line, working outward toward the outer corner.
Use short, gentle strokes instead of one long line for better accuracy.
Optional: Slightly extend the line at the outer corner for a subtle wing.
Tips for Beginners:
Stick to black or brown shades for a natural look.
Keep your hand steady by resting your elbow on a flat surface.
Clean up mistakes with a cotton swab dipped in makeup remover.
10.Applying Mascara
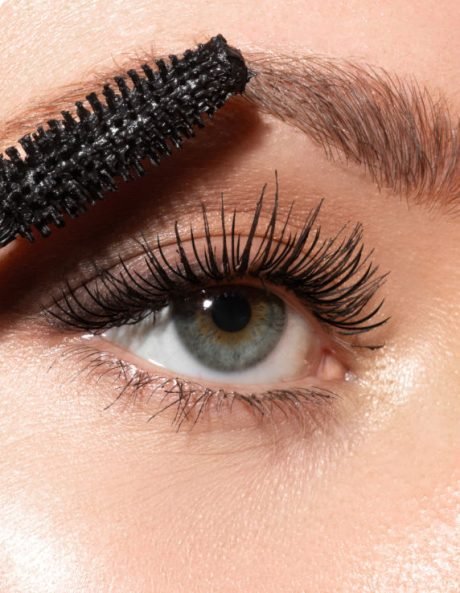
Mascara is used to lengthen, darken, and volumize your eyelashes, making your eyes appear bigger and more awake. For beginners, proper mascara application can dramatically enhance your eye makeup without being complicated. Mascara complements eyeliner and eyeshadow to create a polished, finished look.
Curl your lashes with an eyelash curler (optional) to lift and open your eyes.
Remove excess mascara from the wand to prevent clumping.
Start at the roots of your lashes and wiggle the wand upward to the tips.
Apply 1–2 coats, letting each coat dry slightly before the next.
Optional: Lightly coat your lower lashes for a complete look.
Tips for Beginners:
Avoid pumping the mascara wand, as it introduces air and dries out the product.
Focus on upper lashes first; lower lashes can be optional for a subtle effect.
11.Applying Blush
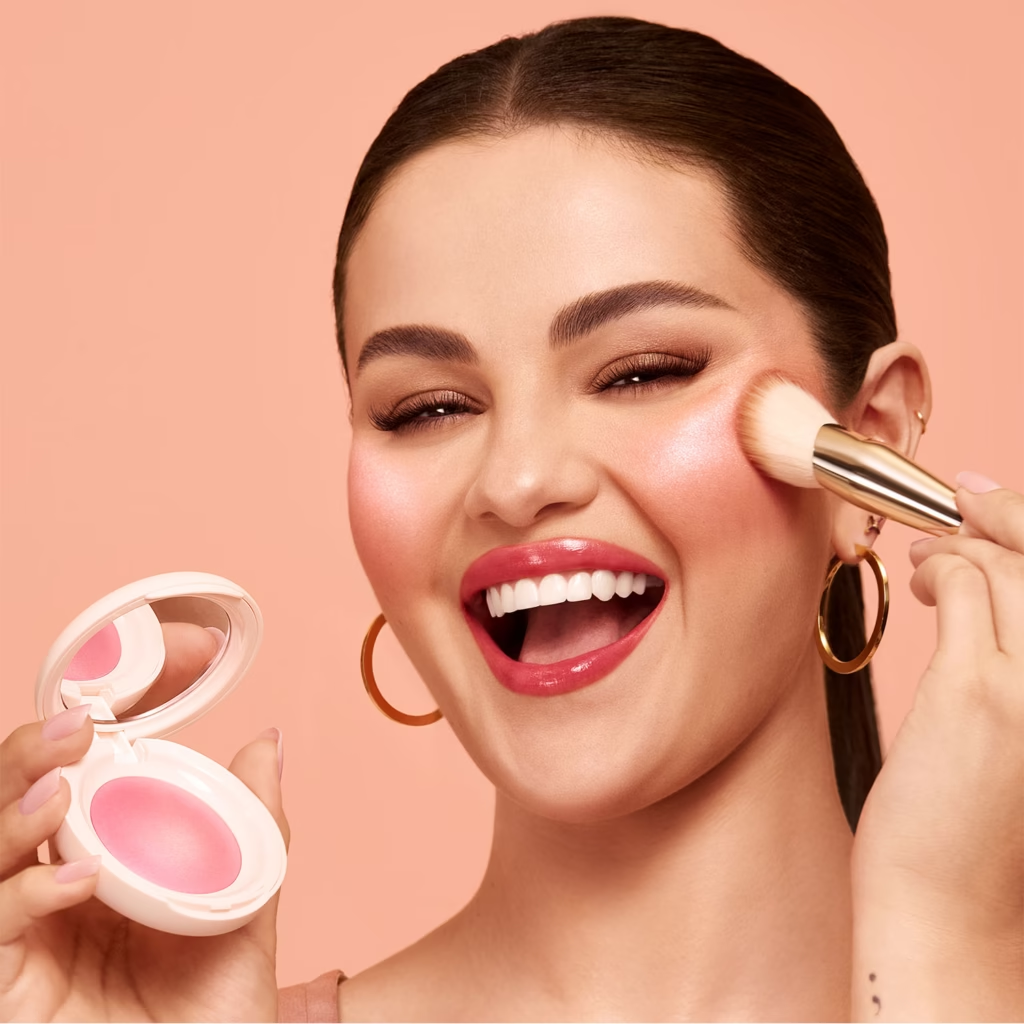
Blush adds color and warmth to your face, giving it a fresh and healthy appearance. For beginners, it helps to brighten your complexion and define your cheekbones naturally. Using the right shade and applying it correctly ensures a soft, natural look instead of harsh or overly dramatic color.
Smile slightly to locate the apples of your cheeks.
Using a blush brush, apply blush gently on the apples and blend outward toward the temples.
Build the color gradually; start light and add more if needed.
Blend well to avoid harsh lines or uneven patches.
Tips for Beginners:
Stick to soft pink, peach, or nude shades for a natural look.
Avoid applying too much product at once; layering is better.
Use a fluffy brush for easy blending and soft finish.
12. Applying Highlighter
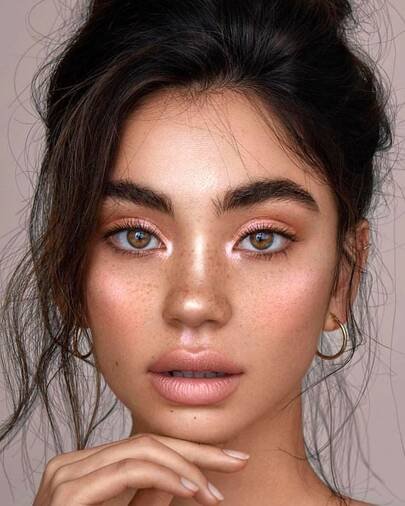
Highlighter is used to accentuate areas of your face where light naturally hits, giving your skin a subtle, radiant glow. It enhances your facial features, making your face look brighter and more dimensional. For beginners, using a soft, light-reflecting shade ensures a natural finish without looking shiny or overdone.
Apply highlighter to the tops of your cheekbones.
Add a small amount on the bridge of your nose for a lifted effect.
Highlight the brow bone and the inner corners of your eyes to make your eyes appear more awake.
Blend gently with fingers, a brush, or a makeup sponge for a seamless glow.
Tips for Beginners:
Use light layers and build gradually for a natural look.
Avoid using glitter-heavy highlighters; stick to soft, shimmery shades.
Blend thoroughly to prevent harsh lines.
13. Applying Lipstick
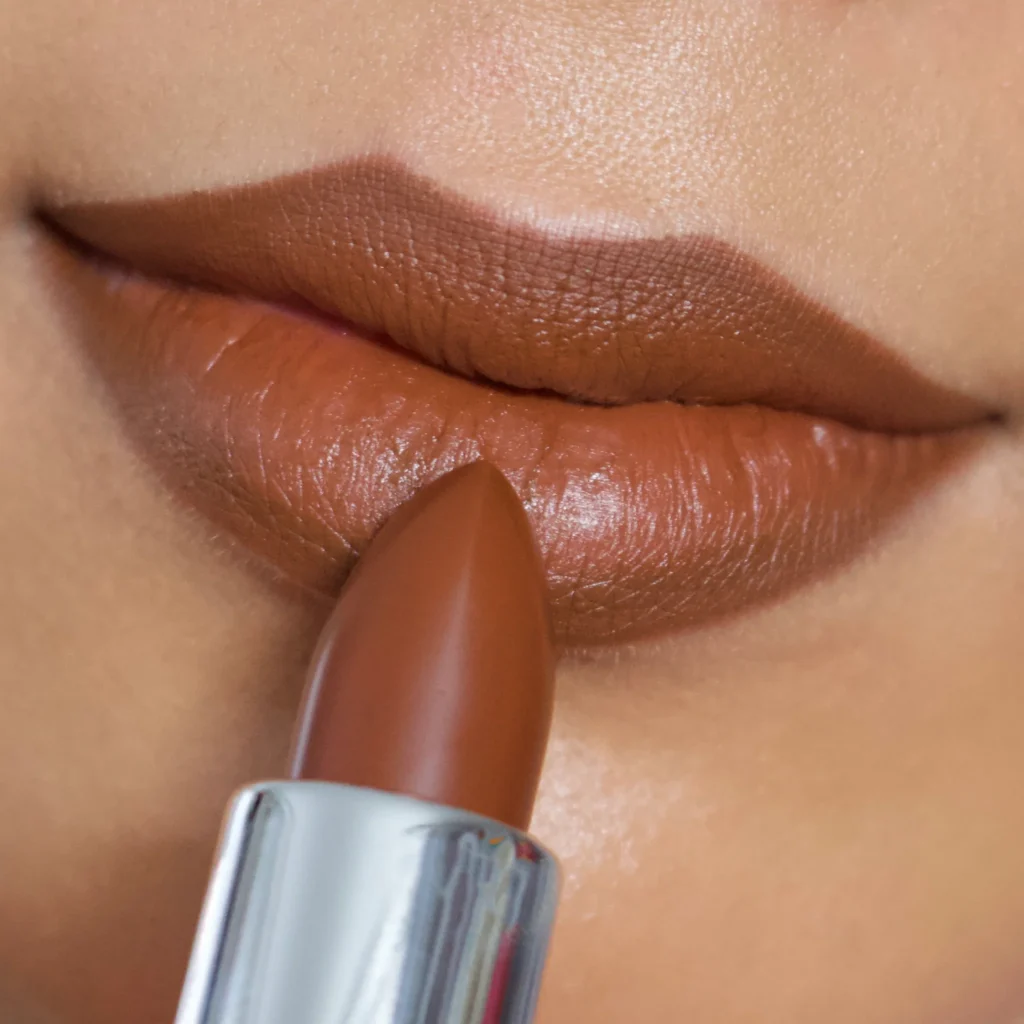
Lipstick adds color, definition, and finishing touch to your makeup look. For beginners, it enhances the lips naturally, completing your overall appearance. Choosing the right shade and applying it correctly ensures a polished and fresh look without smudging or unevenness.
Prep your lips by gently exfoliating and applying a lip balm for smoothness.
Choose a lipstick shade that complements your skin tone and overall makeup.
Start applying from the center of your lips outward, following the natural shape.
Blot with a tissue and reapply for long-lasting color.
Optional: Use a lip liner to define the edges and prevent feathering.
Tips for Beginners:
Start with neutral or soft shades before experimenting with bold colors.
Keep lips moisturized to avoid cracking or dryness.
Clean up edges with a cotton swab or concealer for precision.
14.Applying Makeup Fixing Spray
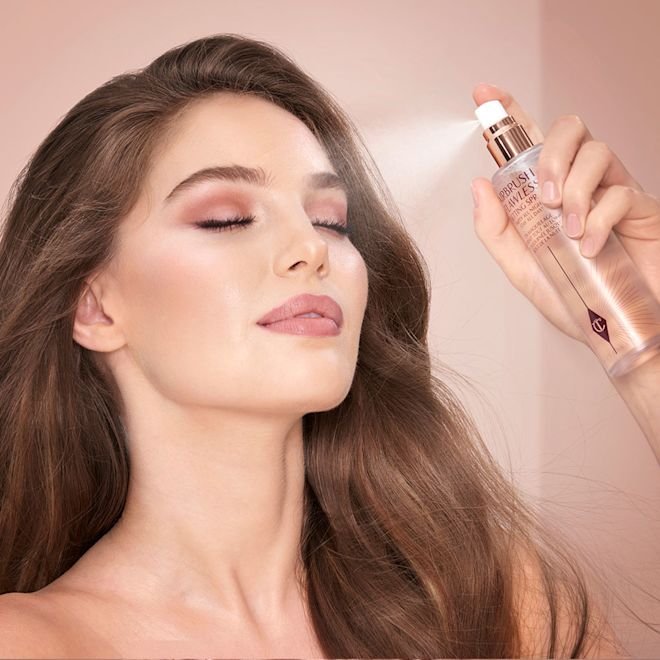
Makeup fixing spray, also called setting spray, helps lock your makeup in place for long-lasting wear. It prevents makeup from smudging, fading, or melting throughout the day, and can also give your skin a fresh, dewy finish. For beginners, it’s the final step to ensure that your makeup stays intact while maintaining a natural look.
Hold the spray bottle 8–12 inches away from your face.
Close your eyes and mouth, then spray in a “T” and “X” motion to cover the whole face evenly.
Let it dry naturally; avoid rubbing your face.
Reapply lightly if needed throughout the day for a refreshed look.
Tips for Beginners:
Choose a spray suitable for your skin type (matte finish for oily skin, dewy for dry skin).
Use a light mist; too much can make makeup look wet or streaky.
Always shake the bottle before use to mix the product properly